Automating Open Graph Images with Serverless, AWS Lambda, and Puppeteer
In This Post
- High Level Architecture Sketch
- Getting Started
- Creating An Image From HTML with Puppeteer
- Porting Our Implementation to AWS Lambda using Serverless
- Saving the Screenshot to S3
- Improving Our Functions Performance
- Next Steps
High Level Architecture Sketch
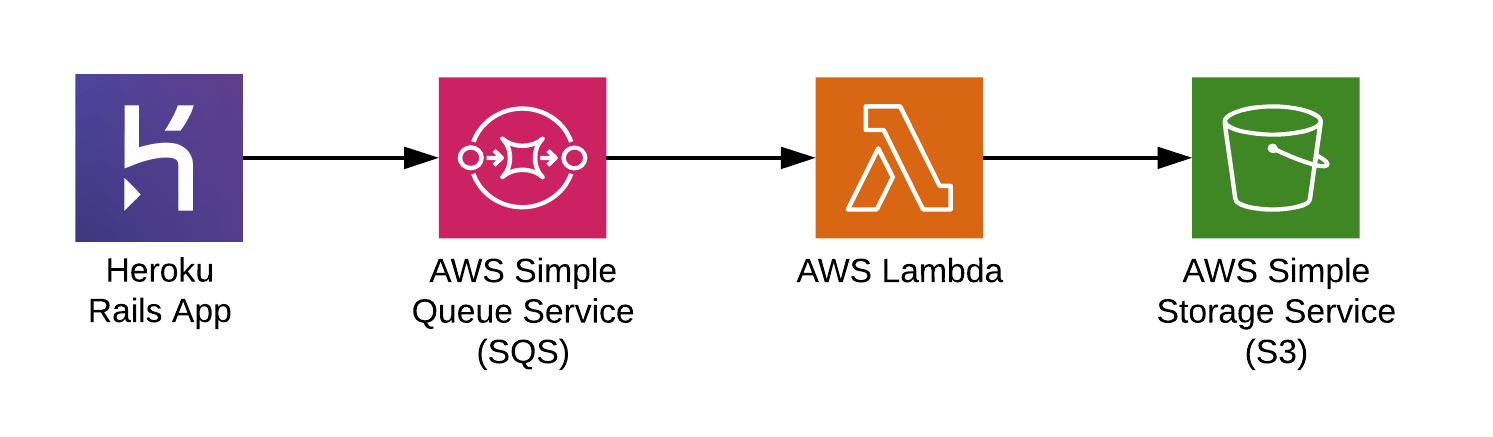
Let’s quickly sketch out how this process might work using AWS Lambda.
The earliest time we can create an image is immediately after a Notification is created. So, let’s push a message to an Amazon SQS queue after we create a Notification and configure AWS Lambda to pull messages from that queue.
Next, let’s have the lambda function take the Notification data, create an image for it, and save the image to S3.
Finally, we can make the path on our S3 bucket predictable (using the Notification#id) and have the web app build the URL and just assume it’s there (this is a bit brittle but it should fail gracefully and be pretty easy to improve later).
Here’s an outline of our goal:
Getting Started
Let’s now take a couple minutes to identify some high risk areas of this implementation so that we can focus our efforts in a way that reduces our risk as we progress.
Here’s what we came up with in order from highest to lowest risk:
- How can we create the image?
- Will the image creation work in AWS Lambda?
- Is SQS the best way to trigger the lambda?
- How do we ensure the image is never out of date? e.g.) when we edit a Notification
- How long will the process take from creation of Notification in the Rails app to image creation?
- How do we backfill all existing notifications?
Okay cool - let’s start going down this list!
Creating An Image From HTML with Puppeteer
We already have a web app and a React Native app that displays something very similar to what we want to see in the image using HTML/CSS. Maybe we can use HTML/CSS to generate the image!
Let’s do some research on technology that can help us do this…
- 🚫 PhantomJS: has suspended development
- 🚫 CasperJS: is no longer maintained
- 🚫 html2canvas: is heavily dependent on the browser; we will be server side so this is out
- 🚫 SlimerJS: looks promising but it doesn’t look like it’s actively under dev; it’s last commit was ~1 year ago.
- 👀 wkhtmltoimage: is an HTML to Image converter using WebKit. This looks like it could be an option!
- 👀 Puppeteer: is a Headless Chrome Node API that is actively maintained and backed by Google Chrome. This also looks like an option!
Puppeteer seems to be the hot new thing; it’s well maintained, has above average documentation, fully supports screenshots, etc.
The only downside the comes to mind is that it requires running an entire browser which means that the package is pretty large and there’s a lot of overhead for just rendering a single page and taking a screenshot.
Let’s give it a shot and see what we can do with it locally.
First let’s install puppeteer:
$ npm install [email protected]
Generating a Screenshot
To start let’s use Puppeteer to take a screenshot of some basic HTML:
const puppeteer = require('puppeteer');

(async () => {
  const htmlPage = `
    <html style="background-color:gray">
      <body>
        <p>Hello</p>
      </body>
    </html>
  `;

  // launch a Chromium instance with a 200x200 `viewport`
  const browser = await puppeteer.launch({
    defaultViewport: { height: 200, width: 200 }
  });

  // open a new tab
  const page = await browser.newPage();

  // set the content of the tab to our html
  await page.setContent(htmlPage);

  // take our screenshot
  await page.screenshot({path: 'screenshot.png'});

  await browser.close();
})();
Awesome, now let’s save this code to a file called htmlScreenshot.js and run it:
$ node htmlScreenshot.js
Our script created a screenshot.png that looks like this:
Great! Now let’s iterate on that and spice up the HTML/CSS a bit:
const puppeteer = require('puppeteer');

(async () => {
  const htmlPage = `
    <!DOCTYPE html>
    <head>
      <style>
        html {
          background: linear-gradient(#FF8126, #FF117E) fixed;
          background-size: cover;
          height: 100%;
        }
        body {
          font-family: "SF Compact Display";
          font-weight: 300;
          font-size: 25px;
          background: url("https://example.com/phone.png") no-repeat top;
          height: 100%;
          width: 900px;
        }
        .container {
          background-color: white;
          padding: 0 20px 20px;
          margin-bottom: 6px;
          border-radius: 0 0 15px 15px;
          font-size: 1em;
          position: absolute;
          left: 172px;
          width: 540px;
          top: 550px;
          min-height: 100px;
        }
        .heading {
          font-family: "SF Compact Text";
          font-size: 1em;
          font-weight: bold;
          margin: 0 0 3px 0;
        }
        .content {
          margin-bottom: 6px;
        }
      </style>
    </head>
    <body>
      <div class="container">
        <h3 class="heading">🍍 Hayy 🍍</h3>
        <div class="content">
          Be a pineapple. Stand tall, wear a crown, and be a little sweet on the inside.
        </div>
      </div>
    </body>
  `;

  const browser = await puppeteer.launch({
    defaultViewport: { height: 900, width: 900 }
  });
  const page = await browser.newPage();
  await page.setContent(htmlPage);
  await page.screenshot({path: 'screenshot.png'});
  await browser.close();
})();
Which generates an image that looks like this:
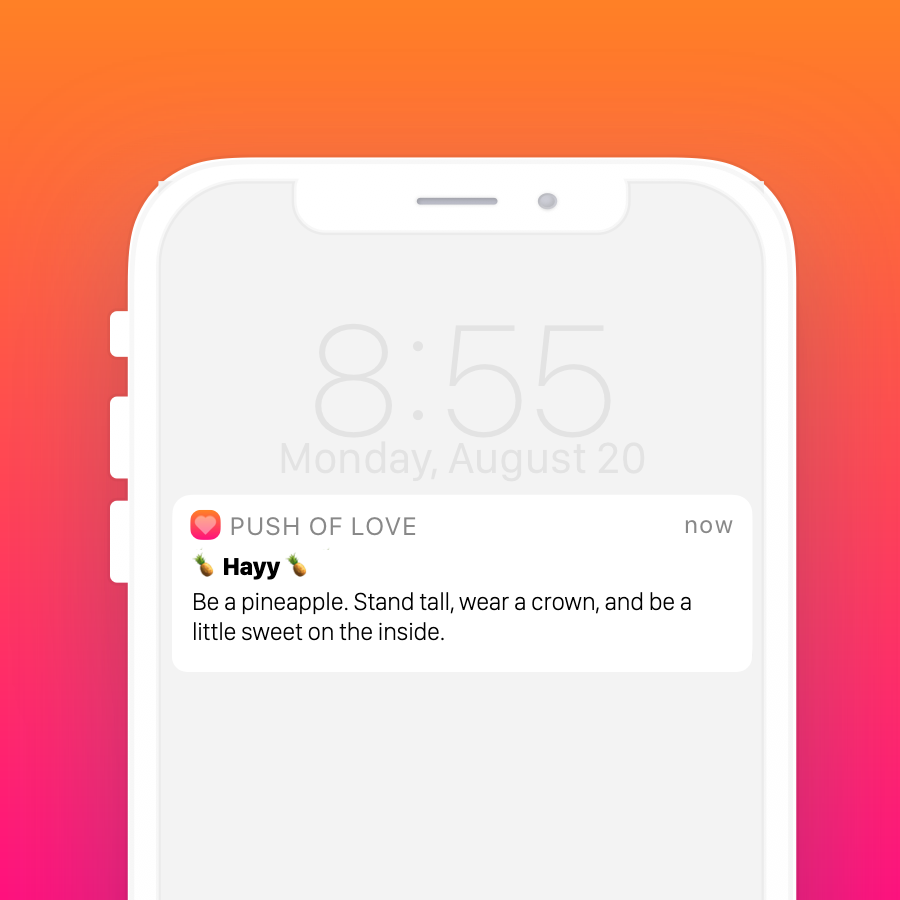
Perfect! That’s exactly what we want!
We just proved that we can create the image from HTML!
Porting Our Implementation to AWS Lambda using Serverless
Deploying a Function with Serverless
To help us manage our new infrastructure completely in source control we’re going to use the Serverless Framework.
# Install serverless globally
$ npm install serverless -g

# Create our function in a new directory
$ serverless create --template aws-nodejs --path ogImageCreator
Note: I used [email protected] when creating this example.
Now we should have a new directory ogImageCreator with two files in it:
serverless.yml
service: ogImageCreator

provider:
  name: aws
  runtime: nodejs8.10

functions:
  hello:
    handler: handler.hello
handler.js
'use strict';

module.exports.hello = async (event, context) => {
  return {
    statusCode: 200,
    body: JSON.stringify({
      message: 'Go Serverless v1.0! Your function executed successfully!',
      input: event,
    }),
  };
};
We now have a new lambda function called hello. Let’s try running it locally!
$ serverless invoke local --function hello
{
    "statusCode": 200,
    "body": "{\"message\":\"Go Serverless v1.0! Your function executed successfully!\",\"input\":\"\"}"
}
Cool, that works great, now let’s deploy it and see if we can run it remotely!
$ serverless deploy
Note: If you haven’t setup serverless with AWS as a provider in the past, before you can deploy, you will need to configure AWS system credentials. We’re not going to go into that in this post, but serverless has a decent guide on how to configure AWS credentials you can check out.
$ serverless invoke --function hello
{
    "statusCode": 200,
    "body": "{\"message\":\"Go Serverless v1.0! Your function executed successfully!\",\"input\":{}}"
}
Awesome! To recap, we just created a function, tested it locally, deployed it to AWS, and ran it on AWS.
Now that have a basic end to end working, let’s see if we can get puppeteer working on AWS Lambda!
Using Puppeteer with AWS Lambda
Using The Puppeteer Package
To use puppeteer in our function we need to add it as a dependency in our project.
# Create a package.json file to manage our dependencies
$ npm init

# Install Puppeteer and save it as a dependency in package.json
# Note: this may time some because it downloads Chromium (~170MB on Mac)
$ npm install puppeteer --save
Now let’s add puppeteer to our function using our code from earlier:
'use strict';

const puppeteer = require('puppeteer');

module.exports.hello = async (event, context) => {
  const htmlPage = `...`; // omitted to reduce length, see above for actual html

  const browser = await puppeteer.launch({
    defaultViewport: { height: 900, width: 900 }
  });
  const page = await browser.newPage();
  await page.setContent(htmlPage);
  await page.screenshot({path: 'screenshot.png'});
  await browser.close();

  return {
    statusCode: 200,
    body: JSON.stringify({
      message: 'Go Serverless v1.0! Your function executed successfully!',
      input: event,
    }),
  };
};
And let’s run it locally:
$ serverless invoke local --function hello
{
    "statusCode": 200,
    "body": "{\"message\":\"Go Serverless v1.0! Your function executed successfully!\",\"input\":\"\"}"
}
Awesome, in our project directory we should now see a screenshot.png that looks identical to the one from earlier!
Now, before we figure out what to do with the image after it’s created, let’s deploy!
$ serverless deploy
Serverless: Packaging service...
Serverless: Excluding development dependencies...
Serverless: Uploading CloudFormation file to S3...
Serverless: Uploading artifacts...
Serverless: Uploading service ogImageCreator.zip file to S3 (256.96 MB)...
Serverless: Validating template...
Serverless: Updating Stack...
Serverless: Checking Stack update progress...
Serverless: Operation failed!
Serverless: View the full error output: https://us-east-1.console.aws.amazon.com/cloudformation/home?region=xxx

  Serverless Error ---------------------------------------

  An error occurred: HelloLambdaFunction - Unzipped size must be smaller than 262144000 bytes (Service: AWSLambdaInternal; Status Code: 400; Error Code: InvalidParameterValueException; Request ID: xxx-xx-xx-xx-xxx).
Oh hell no! It turns our AWS Lambda has some limitations on package size and we’ve exceeded them.
At the time of this writing there are two notable AWS Lambda limitations: Deployment package size must be under 50 MB (zipped, for direct upload) and under 250 MB (unzipped, including layers).
Side Note: Digging a little deeper it turns out there are two ways to upload an AWS Lambda package: you can directly upload the deployment package or upload the package to S3 and have Lambda pull it from there. It appears that the 50 MB compressed limit doesn’t apply when packages are deployed via S3 but does apply when directly uploaded. Serverless uses the S3 method for package deployment so we don’t have to worry about that limit.
Well, we’ve exceeded the unzipped size limit (Yayyy… 🥳).
Looking at the output we can see that we have a max size of 262144000 bytes (or 250 MB) to work with but it doesn’t tell us how big our uncompressed upload was; for kicks, lets see if we can figure that out.
$ serverless package -p /tmp/serverless-package
$ unzip /tmp/serverless-package/ogImageCreator.zip -d /tmp/unzipped-package
$ du -sh /tmp/unzipped-package
601M	/tmp/unzipped-package
It looks like our uncompressed package is just over 600MB… well that’s a wee bit bigger than our allotted limit of 250 MB.
So what are our options here?
Searching around it looks like we’re not the only ones to run into this problem and luckily there is a Serverless Chrome library that appears to address this exact issue and even includes a plugin for Serverless!
Using The Serverless Chrome Library
Let’s change our project to start using the Serverless Chrome library’s Serverless Framework plugin (woah, that was hard to say).
The serverless-chome-plugin includes Chromium and launches it for us so we’re going to have both swap out puppeteer with puppeteer-core1 and adjust how we connect to Chrome.
So, let’s do the following:
- Remove
puppeteerand addpuppeteer-core$ npm rm puppeteer $ npm install puppeteer-core --save - Change our Puppeteer import in
handler.jsto usepuppeteer-core1const puppeteer = require('puppeteer-core'); - Add
serverless-plugin-chromeas a Serverless plugin$ serverless plugin install --name serverless-plugin-chrome - Add
chrome-launceras a development dependency (this allows us to run locally)$ npm install chrome-launcher --save-dev - Change how Puppeteer connects to Chrome
const browser = await puppeteer.connect({
  browserURL: 'http://127.0.0.1:9222',
  defaultViewport: { height: 900, width: 900 }
});
Great! Now let’s see if it still runs locally.
$ serverless invoke local --function hello
Serverless: Injecting Headless Chrome...
@serverless-chrome/lambda: Spawning headless shell
@serverless-chrome/lambda: It took 1310ms to spawn chrome.
{
 "statusCode": 200,
 "body": "{\"message\":\"Go Serverless v1.0! Your function executed successfully!\",\"input\":\"\"}"
}
Awesome! We have a success message and our generated screenshot.png looks great.
Next, let’s take a peek at the uncompressed package size:
$ serverless package -p /tmp/serverless-package
$ unzip /tmp/serverless-package/ogImageCreator.zip -d /tmp/unzipped-package
$ du -sh /tmp/unzipped-package
109M	/tmp/unzipped-package
Perfect, we’re now at 109 MB which is well below our 250 MB limit!
Getting Our Function to Run Remotely
Now that we have a reasonably sized package, let’s give deploying another shot…
$ serverless deploy
...
Serverless: Stack update finished...
Woohoo - looks like it worked! Let’s see if we can run it..
$ serverless invoke --function hello
{
    "errorMessage": "2019-03-14T23:47:59.695Z 799355f1-6226-41cb-8fc2-aa327beb42e4 Task timed out after 6.01 seconds"
}
Boooo! Looks like our task timed out (the default timeout is 5 seconds).
Let’s see if we can figure out a bit more about what happened by taking a peek at our logs.
$ serverless logs -f hello
2019-03-14 17:47:55.661 (-06:00)	799355f1-6226-41cb-8fc2-aa327beb42e4	Error occured in serverless-plugin-chrome wrapper when trying to ensure Chrome for hello() handler. { flags: [] } { Error: EROFS: read-only file system, open 'screenshot.png'
  -- ASYNC --
    at Page.<anonymous> (/var/task/node_modules/puppeteer-core/lib/helper.js:108:27)
    at Object.module.exports.hello (/var/task/m3hbz3zo5h___handler.js:62:14)
    at <anonymous>
    at process._tickDomainCallback (internal/process/next_tick.js:228:7)
  errno: -30,
  code: 'EROFS',
  syscall: 'open',
  path: 'screenshot.png' }
2019-03-14 17:47:55.664 (-06:00)	799355f1-6226-41cb-8fc2-aa327beb42e4	{"errorMessage":"EROFS: read-only file system, open 'screenshot.png'","errorType":"Error","stackTrace":["  -- ASYNC --","Page.<anonymous> (/var/task/node_modules/puppeteer-core/lib/helper.js:108:27)","Object.module.exports.hello (/var/task/m3hbz3zo5h___handler.js:62:14)","<anonymous>","process._tickDomainCallback (internal/process/next_tick.js:228:7)"]}
END RequestId: 799355f1-6226-41cb-8fc2-aa327beb42e4
REPORT RequestId: 799355f1-6226-41cb-8fc2-aa327beb42e4	Duration: 6006.15 ms	Billed Duration: 6000 ms 	Memory Size: 1024 MB	Max Memory Used: 244 MB

2019-03-14T23:47:59.695Z 799355f1-6226-41cb-8fc2-aa327beb42e4 Task timed out after 6.01 seconds
Note: By default serverless logs -f functionName will give you the logs for the function functionName for the past 10 minutes. There is a bit of delay on it, so if you don’t see an expected output try waiting a minute and trying again.
Interesting, so it looks like there’s a couple things going on here:
- we’re getting the same timeout message from earlier:
Task timed out after 6.01 seconds. - we’re getting a
EROFS: read-only file systemerror which seems to happen when we attempt to save our screenshot toscreenshot.png.
The EROFS: read-only file system error makes sense because AWS Lambda doesn’t allow you to write directly to the file system2, but it also implies that our function actually ran… So why did it timeout?
It turns out the actual behavior on AWS Lambda is a bit different than what we’ve been seeing locally.
Let’s see if we can get a better local environment to make this a bit easier and quicker3 to debug.
Improving our Local Environment using LambCI
Invoking a function through the Serverless CLI basically just runs the function in your local Node.js environment. This works great for simple stuff but sometimes we need an environment that more accurately matches production.
It turns out, as I was writing this post, Serverless released a new version (1.39) that includes docker support for local invocation. However, it also turns out, there’s currently a bug that’s resulting in Serverless Plugin dependencies not being included when you locally invoke with docker 😔 so that won’t work for us.
Let’s use LambCI on Docker using lambci-docker.
$ # Pull the docker image
$ docker pull lambci/lambda:nodejs8.10

$ # Package and unzip it
$ serverless package -p package && unzip -q package/ogImageCreator -d dist

$ # Run the function using the docker image
$ docker run --rm -v /Users/scott/src/ogImageCreator/dist:/var/task lambci/lambda:nodejs8.10 handler.hello {}
START RequestId: ae4e963b-07d5-1c19-4a08-2c8ff5b1d662 Version: $LATEST
END RequestId: ae4e963b-07d5-1c19-4a08-2c8ff5b1d662
REPORT RequestId: ae4e963b-07d5-1c19-4a08-2c8ff5b1d662	Duration: 1307.42 ms	Billed Duration: 1400 ms	Memory Size: 1536 MB	Max Memory Used: 40 MB

{"statusCode":200,"body":"{\"message\":\"Go Serverless v1.0! Your function executed successfully!\",\"input\":{}}"}
So it looks like we have more similar output to when we invoke the function remotely but everything looks like it was successful. This is because our volume is not read only, like it is on AWS Lambda. We can fix this by simply appending :ro to the path where we’re mounting our volume.
$ docker run --rm -v /Users/scott/src/ogImageCreator/dist:/var/task:ro lambci/lambda:nodejs8.10 handler.hello {}
START RequestId: a50218e7-c810-1ecc-7bcc-5e635285bb1d Version: $LATEST
2019-03-23T04:04:28.567Z	a50218e7-c810-1ecc-7bcc-5e635285bb1d	Error occured in serverless-plugin-chrome wrapper when trying to ensure Chrome for hello() handler. { flags: [] } { Error: EROFS: read-only file system, open 'screenshot.png'
  -- ASYNC --
    at Page.<anonymous> (/var/task/node_modules/puppeteer-core/lib/helper.js:108:27)
    at Object.module.exports.hello (/var/task/doaf78zxju9___handler.js:63:14)
    at <anonymous>
    at process._tickDomainCallback (internal/process/next_tick.js:228:7)
  errno: -30,
  code: 'EROFS',
  syscall: 'open',
  path: 'screenshot.png' }
2019-03-23T04:04:28.578Z	a50218e7-c810-1ecc-7bcc-5e635285bb1d	{"errorMessage":"EROFS: read-only file system, open 'screenshot.png'","errorType":"Error","stackTrace":["  -- ASYNC --","Page.<anonymous> (/var/task/node_modules/puppeteer-core/lib/helper.js:108:27)","Object.module.exports.hello (/var/task/doaf78zxju9___handler.js:63:14)","<anonymous>","process._tickDomainCallback (internal/process/next_tick.js:228:7)"]}
There it is!
Now the only difference appears to be that rather than timing out like it would on AWS it just hangs indefinitely. Let’s not worry about that for now and instead try to figure out how to fix our code.
Taking a look at our code you’ll notice that there’s only one line of code under the screenshot that isn’t running due to the error await browser.close().
It turns out this is a problem because by default AWS Lambda continues the Lambda function invocation until the event loop is empty and when we call await puppeteer.connect we add to the event loop and only remove from it when we close the browser await browser.close();.
To fix this let’s do the following:
const browser = await puppeteer.connect({
  browserURL: 'http://127.0.0.1:9222',
  defaultViewport: { height: 900, width: 900 }
});

try {
  const page = await browser.newPage();
  await page.setContent(htmlPage);
  await page.screenshot({path: 'screenshot.png'});
} finally {
  await browser.close();
}
Now let’s try running it again:
$ # Remove our old package
$ rm -r package && rm -r dist

$ # Package and unzip our code
$ serverless package -p package && unzip -q package/ogImageCreator -d dist

$ docker run --rm -v /Users/scott/src/ogImageCreator/dist:/var/task:ro lambci/lambda:nodejs8.10 handler.hello {}
  START RequestId: aac84403-6134-1939-93d3-33a1896f00c4 Version: $LATEST
  2019-03-23T04:36:31.932Z	aac84403-6134-1939-93d3-33a1896f00c4	Error occured in serverless-plugin-chrome wrapper when trying to ensure Chrome for hello() handler. { flags: [] } { Error: EROFS: read-only file system, open 'screenshot.png'
    -- ASYNC --
      at Page.<anonymous> (/var/task/node_modules/puppeteer-core/lib/helper.js:108:27)
      at Object.module.exports.hello (/var/task/fk52rd5t6w7___handler.js:64:16)
      at <anonymous>
      at process._tickDomainCallback (internal/process/next_tick.js:228:7)
    errno: -30,
    code: 'EROFS',
    syscall: 'open',
    path: 'screenshot.png' }
  2019-03-23T04:36:31.936Z	aac84403-6134-1939-93d3-33a1896f00c4	{"errorMessage":"EROFS: read-only file system, open 'screenshot.png'","errorType":"Error","stackTrace":["  -- ASYNC --","Page.<anonymous> (/var/task/node_modules/puppeteer-core/lib/helper.js:108:27)","Object.module.exports.hello (/var/task/fk52rd5t6w7___handler.js:64:16)","<anonymous>","process._tickDomainCallback (internal/process/next_tick.js:228:7)"]}
  END RequestId: aac84403-6134-1939-93d3-33a1896f00c4
  REPORT RequestId: aac84403-6134-1939-93d3-33a1896f00c4	Duration: 1383.05 ms	Billed Duration: 1400 ms	Memory Size: 1536 MB	Max Memory Used: 41 MB

  {"errorMessage":"EROFS: read-only file system, open 'screenshot.png'","errorType":"Error","stackTrace":["  -- ASYNC --","Page.<anonymous> (/var/task/node_modules/puppeteer-core/lib/helper.js:108:27)","Object.module.exports.hello (/var/task/fk52rd5t6w7___handler.js:64:16)","<anonymous>","process._tickDomainCallback (internal/process/next_tick.js:228:7)"]}
Awesome! It doesn’t hang anymore. Let’s deploy and try running again:
$ serverless deploy
$ serverless invoke --function hello
{
  "errorMessage": "EROFS: read-only file system, open 'screenshot.png'",
  "errorType": "Error",
  "stackTrace": [
    "  -- ASYNC --",
    "Page.<anonymous> (/var/task/node_modules/puppeteer-core/lib/helper.js:108:27)",
    "Object.module.exports.hello (/var/task/o3lrkkn7r6g___handler.js:64:14)",
    "<anonymous>",
    "process._tickDomainCallback (internal/process/next_tick.js:228:7)"
  ]
}
Great! We’re no longer getting a timeout!
Next, let’s see if we can take a look at the image that is being created on AWS Lambda by our script. In order to do that, let’s configure our script to upload the screenshot to S3.
Saving the Screenshot to S3
We need to do the following:
- Create a new bucket directly on AWS S3 using AWS’s CLI (can also do this via AWS’s UI)
$ aws s3api create-bucket --bucket og-image-creator --region us-east-1 - Install aws-sdk as a project dependency
$ npm install aws-sdk --save - Modify
serverless.ymlto create an env variable with our bucket name and give us PutObject permission - Modify
handler.jsto save the screenshot directly to S3
Our modified serverless.yml:
custom:
  bucket: og-image-creator
provider:
  name: aws
  runtime: nodejs8.10
  iamRoleStatements:
    - Effect: Allow
      Action:
        - s3:PutObject
      Resource: "arn:aws:s3:::${self:custom.bucket}/*"
functions:
  hello:
    handler: handler.hello
    environment:
      BUCKET: ${self:custom.bucket}
Our modified handler.js:
const puppeteer = require('puppeteer-core');
const AWS = require('aws-sdk');
const s3 = new AWS.S3();

module.exports.hello = async (event, context) => {
  const htmlPage = `...`;
  const browser = await puppeteer.connect({
    browserURL: 'http://127.0.0.1:9222',
    defaultViewport: { height: 900, width: 900 }
  });

  try {
    const page = await browser.newPage();
    await page.setContent(htmlPage);
    const buffer = await page.screenshot();
    await s3.putObject({
      Bucket: process.env.BUCKET,
      Key: "screenshot.png",
      Body: buffer,
      ContentType: 'image/png'
    }).promise();
  } finally {
    await browser.close();
  }

  return {
    statusCode: 200
  };
};
Let’s give it a spin locally take a look at the screenshot from S3
$ serverless invoke --function hello
$ # Download our object from S3 and save it locally
$ aws s3api get-object --bucket og-image-creator --key screenshot.png s3-screenshot.png
$ open s3-screenshot.png
Here’s what we get:
Perfect! That’s exactly what we want.
But… given the problems we ran into with invoking our function this way, we should probably see what happens using docker before we deploy.
$ # Remove our old package
$ rm -r package && rm -r dist

$ # Package and unzip our code
$ serverless package -p package && unzip -q package/ogImageCreator -d dist

$ # Run our function like we did before but include some env variables
$ docker run --rm -e "BUCKET=og-image-creator" -e "AWS_ACCESS_KEY_ID=bla" -e "AWS_SECRET_ACCESS_KEY=bla" -v /Users/scott/src/ogImageCreator/dist:/var/task:ro lambci/lambda:nodejs8.10 handler.hello {}
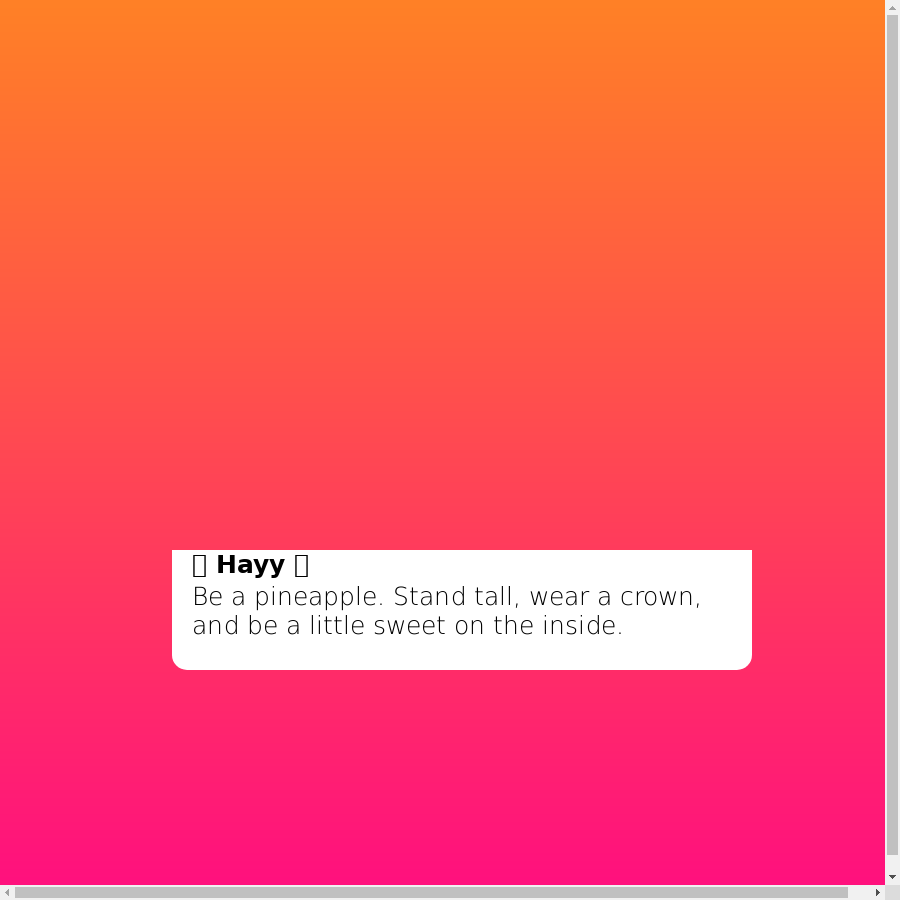
And we get this disaster of an image. It looks like there are several problems:
- A scrollbar is present
- The background image didn’t render
- The emojis didn’t render
- The correct font didn’t render
Let’s tackle these one by one:
1. A scrollbar is present
To fix this we basically need to tell Chrome to not include scrollbars when it launches. Because we’re using the Serverless Chrome Plugin we need modify our serverless.yml config and add the following:
custom:
  chrome:
    flags:
      - --hide-scrollbars
2. The background image didn’t render
This one is a bit annoying. It turns out our background image isn’t rendering because we’re taking the screenshot before the image was fully loaded.
By default page.setContent(htmlPage); waits for the load event to fire but that apparently isn’t good enough. We can also try wait for network traffic to be idle, like so page.setContent(html, { waitUntil: ['load', 'networkidle0'] }) but that doesn’t appear to do the trick either.
Note: according to the docs networkidle0 is supposed to wait until there have been “no more than 0 network connections for at least 500 ms.”. In my testing this doesn’t actually seem to be the case; the page.setContent function was completing in under 30 ms (well below the expected 500 ms after 0 network traffic)
So, to fix this, let’s just put a wait in there (😔).
await page.setContent(htmlPage);
await page.waitFor(2000);
const buffer = await page.screenshot();
3. The emojis didn’t render
To fix this we need to install an emoji font. Let’s use the EmojiOne ios font.
Let’s download emojione-ios.ttc and place it in a new directory called fonts in our project.
Next, we need to create a fonts/fonts.conf with the following content:
<?xml version="1.0"?>
<!DOCTYPE fontconfig SYSTEM "fonts.dtd">
<fontconfig>
  <dir>/var/task/fonts/</dir>
  <cachedir>/tmp/fonts-cache/</cachedir>
  <config></config>
</fontconfig>
Now all we just need to set the FONTCONFIG_PATH env variable (by modifying our serverless.yml):
functions:
  hello:
    handler: handler.hello
    environment:
      BUCKET: ${self:custom.bucket}
      FONTCONFIG_PATH: /var/task/fonts
4. The correct font didn’t render
We did all the hard work in the previous step, so all we need to do is find our font files (.otf) and copy them to the /fonts directory
Now let’s take a look at what we got:
$ docker run --rm -e "FONTCONFIG_PATH=/var/task/fonts" -e "BUCKET=og-image-creator" -e "AWS_ACCESS_KEY_ID=bla" -e "AWS_SECRET_ACCESS_KEY=bla" -v /Users/scott/src/ogImageCreator/dist:/var/task:ro lambci/lambda:nodejs8.10 handler.hello {}
$ aws s3api get-object --bucket og-image-creator --key screenshot.png s3-screenshot.png
$ open s3-screenshot.png
Perfect!
Now all we need to do is deploy our function and we’re good to go.
$ serverless deploy
$ serverless invoke --function hello
Well, that was super easy.
Improving Our Functions Performance
It turns out that sometimes the function doesn’t run properly. Let’s increase our memory to 1536 MB to fix this.
In serverless.yml under provider let’s add a memorySize:
provider:
  name: aws
  runtime: nodejs8.10
  memorySize: 1536
Note: Although we’re only specifying an increase in memory, we’re actually also increasing processing power. This is because AWS Lambda allocates CPU power proportional to memory.
Next Steps
In this post we answered two of our unknowns:
How can we create the image?Will the image creation work in AWS Lambda?- Is SQS the best way to trigger the lambda?
- How do we ensure the image is never out of date? e.g.) when we edit a Notification
- How long will the process take from creation of Notification in the Rails app to image creation?
- How do we backfill all existing notifications?
In our next post we will answer our remaining questions.
-
Puppeteer Core is a version of Puppeteer that doesn’t include Chromium. Read more about the differences between Puppeteer and Puppeteer Core here. ↩ ↩2
-
AWS Lambda doesn’t let you write to the default file system but it does provide 500 MB of space in
/tmp↩ -
I’m currently living in the mountains out in Boulder, Colorado and the fastest internet offered here is a DSL connection that maxes out at a lovely 1 Mbit/s upload speed. If you do the math that means.. best case.. it takes me roughly 7 minutes to upload the ~50MB package and 37 minutes 😳 to upload that ~257MB package. ↩